In today's lesson, we filmed some more footage which by the end of the lesson, we edited into our music video on Final Cut Pro. As most of our footage is taken inside, we decided that it would be a good idea to film footage outside, to give the video a mixed atmosphere.
The filming took place in Sam's car, and at the bus stop just around the corner from our Sixthform centre. We also took some shots of the clouds, to flourish the weather.
Thursday, 22 November 2012
Wednesday, 21 November 2012
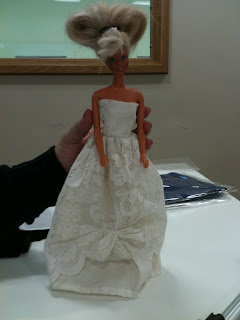
Barbie's 'Wedding Dress'
Has there is a line within a verse in our song, which insinuates on Barbie getting married, we thought it would be a good idea to try and get hold of a Wedding dress for Barbie, so we could match one of Goodwin's theories; 'Lyrics to visuals'.
By searching around each other's old toys, we came across a dress that we could use as a Wedding Dress.

By searching around each other's old toys, we came across a dress that we could use as a Wedding Dress.

The Wedding Dress.

Barbie "on her wedding day".
As the song is indicating that Barbie is getting married, we felt that it was only right to make her look as nice as possible. In previous scenes, Barbie's hair has been a mess, therefore by using a hairband, we put her hair up as neatly as possible, to make her presentable and 'beautiful' at her wedding day.
Target Audience
'A target audience, is a specific group of people within the target market at which a product or the marketing message of a product is aimed at. A target audience can be formed at people of a certain age group, gender etc. e.g. teenagers, females, single people and men'
For our song choice and music video, we have chosen to aim our target audience at teenagers. As our music video shows signs of quirkiness and objects and symbols of the younger generation, we felt that it was right to target our video at a audience that would be able to understand and relate towards it. Not only this, but the genre in which our song choice flourishes, fits in well with the popular 'Indie/pop' type of genre popular in today's industry.
Our music video presents bright colours entirely throughout. When discussing and planning our storyboards, we took into consideration other Music video's and TV Shows that have also targeted the teenage audience. We came across TV Show 'The Inbetweeners', which has successfully become popular amongst our chosen target audience. By watching a few episodes together, and by doing background research, we noticed that the show produced a bright, bold and quirky look to it, especially in the Title sequence. We decided to take upon the same atmosphere and appearance as 'The Inbetweeners' and therefore used them as an inspiration towards our work.
Our choice of using the Barbie doll as the 'Weather Girl' took a lot of thinking towards. As we knew our target audience was the younger generation; teenagers, we wanted to introduce something within our music video to keep them entertained and almost 'hook' onto it. We decided that if we was to use a human being to play the role of the 'weather girl', it would come across as original and targeted slightly more to the older generation. Therefore, by using the Barbie doll, it added a slight unusual quirkiness to the video, and also introduced a object in which the target audience would be familiar to. With Barbie taking on the role of the 'Weather girl', this also implies "every young girls dream" to be like Barbie, a.k.a "Perfect" and she almost becomes inspirational to the audience, taking on the star image.
Overall, we have made our music video as fun and as creative as possible, to tie our audience in, and to target their own personal personalities and interests.
Tuesday, 13 November 2012
Template of Digipak

This is a rough template, which we will be using for our Digipak design. However, as we will only be publishing and selling one song, we will only be producing a Single cover, instead of a full Album cover.
We plan to display the artist as much as possible on the Digipak, to flourish the star image. This is very important, as it makes the Digipak more eye leading, and easy to find for the Artist's fans.
Digipak Research
The CD DigiPak (or CD Digi-pak) is a modern, stylish alternative to the standard CD Jewel Case. CD Digipaks are a custom printed card packaging that can hold one or more CDs which are held in place with plastic trays (CD flexitrays) which are glued into the digipak.

CD DigiPacks are especially popular in the music industry for CD albums as well as multiple CD disc sets. CD Digipaks give a product an expensive professional look and feel – especially when well designed CD artwork is combined with clever use of specialist print finishing options such as Matt Lamination, Spot UV or Embossing. (All of these options are listed in the ‘Additional Options’ Section of our Advanced quote page -along with an explanation and sample image for each finish).

CD Digipaks were originally only seen as limited edition or specialist CD products however improvements in CD production and CD packaging printing techniques has meant that this sleek CD packaging solution is now available at much lower quantities and at much lower prices.
CD Digipacks are made out of card stock (with recycled card options available). The most common CD Digipaks is the 4 panel Digipak which opens like a book. However 6 panel CD Dipipaks are also very popular, providing a larger canvas for CD artwork and text information about the CD. 8 panel and even 10 panel CD Digipaks are also available. In fact, being made from cardboard stock, the number of panels, CD trays and CD booklets mean that CD Digipak combinations almost infinite – such versatility makes it is easy to see how the CD DigiPak has become such a popular CD packaging solution.
Unlike CD Jewel Cases Digipak-style packaging is made from cardboard and as such can be considered less resistant to wear than CD jewel cases. Disc Factory minimise this issue by applying a protective gloss or matt varnish to all our CD Digipak packaging as standard, however we strongly recommend our matt lamination finish (a process in which we add a thin transparent plastic film to the surface of card packaging) as this extra plastic coating gives the CD Digipak even more rigidity, providing not only increased longevity, but also making the treated surfaces water resistant too. Matt lamination also has the added benefit of giving the finished surface of the digipak a soft “satin” finish that is really smooth to the touch.
Tuesday, 6 November 2012
Today's Lesson
In today's lesson, we will be editing the stop motion footage that we achieved last lesson, and will try putting it together with all of the other footage we have already captured.
Voyeurism of Barbie
As we want to create as much voyeurism as possible in our music video, we decided to cut the leftover bit of dress we had from cutting Barbie's dress, and cutting it into a swimming bikini. As Barbie is a female, she will attract the male audience, therefore in order to attract them more, we thought it would be a good idea, to reveal more parts of her body; voyeurism.

We made the bikini by cutting the fabric into shape of a bikini, and simply using blue tac, to stick it to her body.


With the fabric of the bikini being the colour of red, this indicates both love and sexual tension, thereby attracting the male audience more.
Filming the Stop Motion
As our last attempt of filming the stop motion went wrong due to there not being enough light provided, we changed rooms. The room we changed to produced more light, mainly due to the reason of it having more lights in the ceiling, and also due to the fact that the colour of the walls were white.
We also hired out a few lights in order to highlight our set, gaining us a lighter and more sufficient camera shot. We used a soft box which we located in front of the set. As the soft box was the biggest light, we thought it would be a good idea to place it in front of the set, so it could reflect light straight onto the set, to make it bright. We also used the two lights presented in the picture below. These lights didn't produce a lot of light source, but it was enough to make sure the set was fully highlighted, to ensure that there was no dark images in the filming of our stop motion.

To be able to do our stop motion, we used a digital camera to capture the shots. After using istopmotion in our last lesson, we decided that using the digital camera, would produce a better quality picture, therefore it would look better in our final outcome. We also didn't work well with istopmotion, and therefore wanted to choose a easier but more sufficient way.

This is an image taken of the stop motion footage in process. With Becca in charge of capturing the images, I began to slowly move Barbie to produce our stop motion sequence.
Subscribe to:
Posts (Atom)